Design Pattern(9) - Composite
June 20, 2017以下文章是閱讀 深入淺出Design Pattern 還有 聖經還有Source making的筆記 圖片截圖自lynda.com的Foundations of Programming: Design Patterns 要更深入的理解一定要去看這兩本書
加強版菜單
延續Iterator的菜單例子 如果今天每一個菜單裡面 不一定每項都是菜 也有可能是別的sub菜單
比如說
菜單A: [左宗棠雞, 水煮魚, 酒, 紅燒肉, 甜點]
酒菜單: [百威, 海尼根, 威士忌]
甜點菜單: [千層蛋糕, 拿破崙蛋糕]
威士忌菜單: [約翰跑路, 格蘭利威, 麥卡倫]
昨天那個很認真的服務生 還是想要一一列出所有的選項給客人 可是又不想知道菜單的實作 該怎麼辦呢
簡單 定義一個抽象class同時是菜單的parent class也是菜的parent class
Polymorphism看得懂的!
public abstract class MenuComponent{
    //Menu的operation
    public void remove(MenuComponent m){
	throw UnsupportedOperationException();
    }
    public void add(MenuComponent m){
	throw UnsupportedOperationException();
    }
    public MenuComponent getChild(int i){
	throw UnsupportedOperationException();
    }
    //MenuItem的operation
    public int getPrice(){
	throw UnsupportedOperationException();
    }
    public String getDescription(){
	throw UnsupportedOperationException();
    }
    //Both的operation
    public String getName(){
	throw UnsupportedOperationException();
    }
    public void print(){
	throw UnsupportedOperationException();
    }
}
先來實作菜 每道菜都extend這個MenuComponent 菜不需要實作remove跟add跟getChild
public class MenuItem extends MenuComponent{
    String name;
    String description;
    int price;

    public int getPrice(){
	return price;
    }
    public String getDescription(){
 	return description;
    }
    public String getName(){
 	return name;
    }
    public void print(){
	System.out.print(getName() + ":" + getPrice());
    }
}
再來實作菜單 每個菜單都extend這個MenuComponent 菜單不需要實作getPrice和getDescription
    public void print(){
	System.out.print(getName());
	System.out.print("------");
        Iterator iterator = menuComponent.iterator();
	while(iterator.hasNext()){
	    MenuComponent m = (MenuComponent)iterator.next();
	    m.print();
	}
    }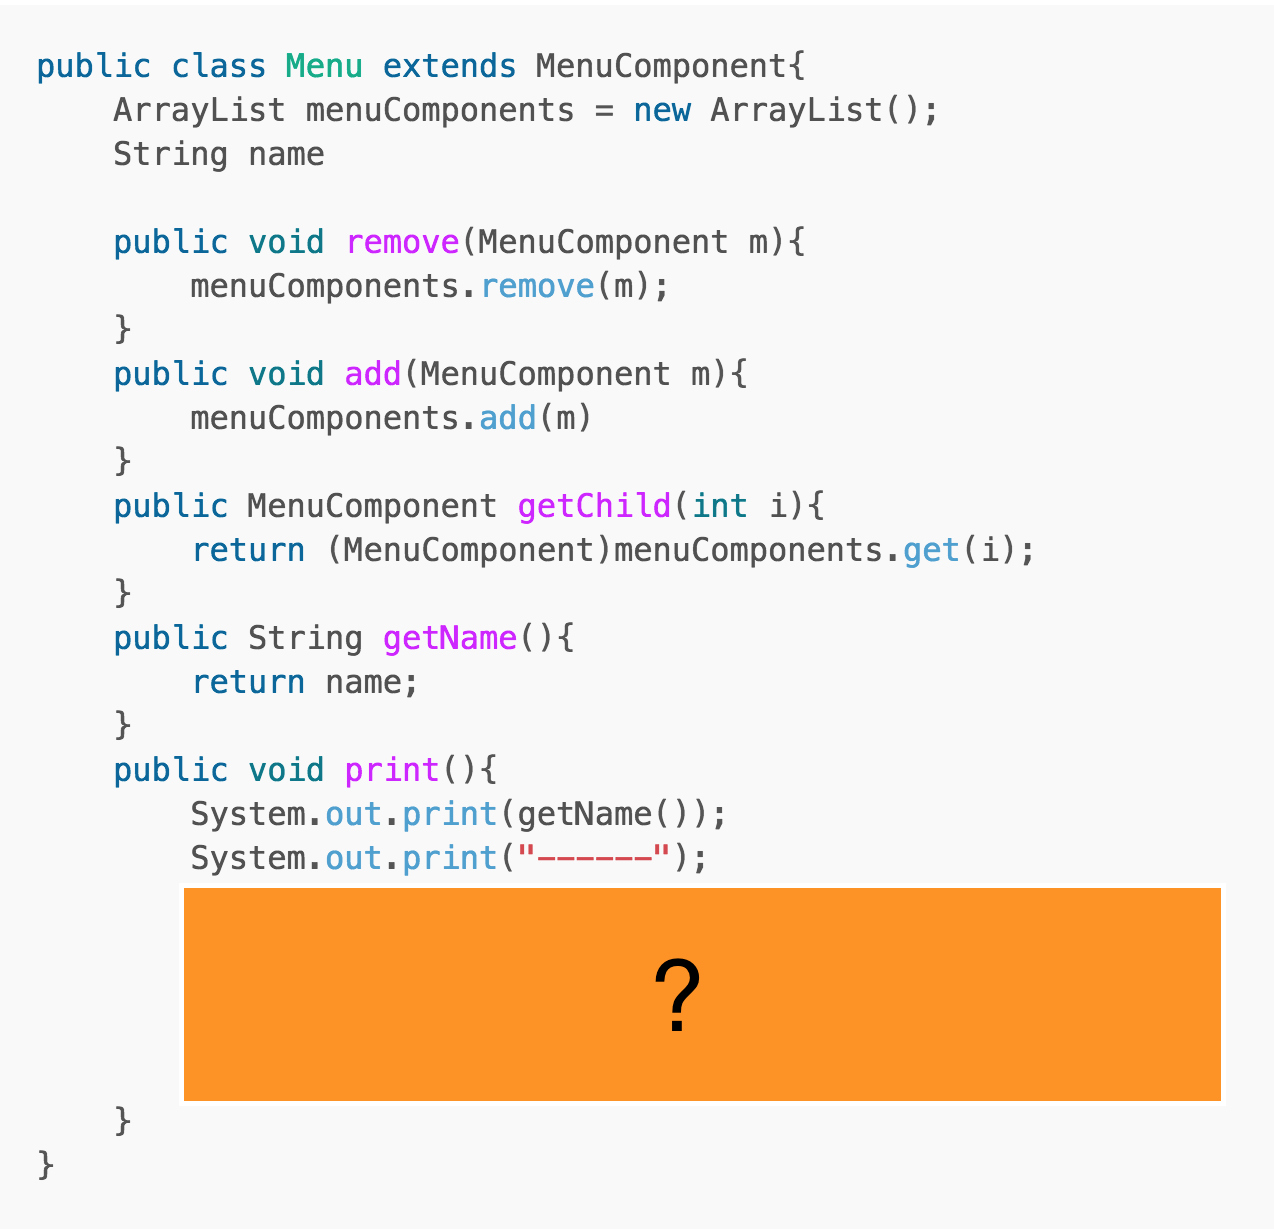
要怎麼print一個菜單呢 給你想10秒鐘

叫出菜單的iterator 然後一個一個call print
DFS!
    public void print(){
	System.out.print(getName());
	System.out.print("------");
        Iterator iterator = menuComponent.iterator();
	while(iterator.hasNext()){
	    MenuComponent m = (MenuComponent)iterator.next();
	    m.print();
	}
    }
那認真的服務生要怎麼列出所有菜呢?
public class Waiter{
    menuComponent allMenus;
    public Waiter(menuComponent allMenus){
	this.allMenus = allMenus;
    }
    public void printMenu(){
	allMenus.print();
    }
}
waiter.printMenu();
說好的單一class單一責任呢
這種做法我們的MenuComponent可能是菜 可能是菜單 還有些UnsupportedOperation實在有夠醜 但好處就是client要print的時候 不用知道現在這東西是菜還是菜單 我們避免了更醜的
if(menuComponent instanceof Menu){
    Iterator iterator = menuComponent.iterator();
    while(iterator.hasNext()){
        MenuComponent m = (MenuComponent)iterator.next();
        m.print();
    }
}else{
    System.out.print(getName() + ":" + getPrice());
}
合成模式
合成模式讓我們將物件合成樹狀結構 呈現 部分-整體 的關係 讓外界可以以一致的方式處理這個個別物件或合成物件
結構
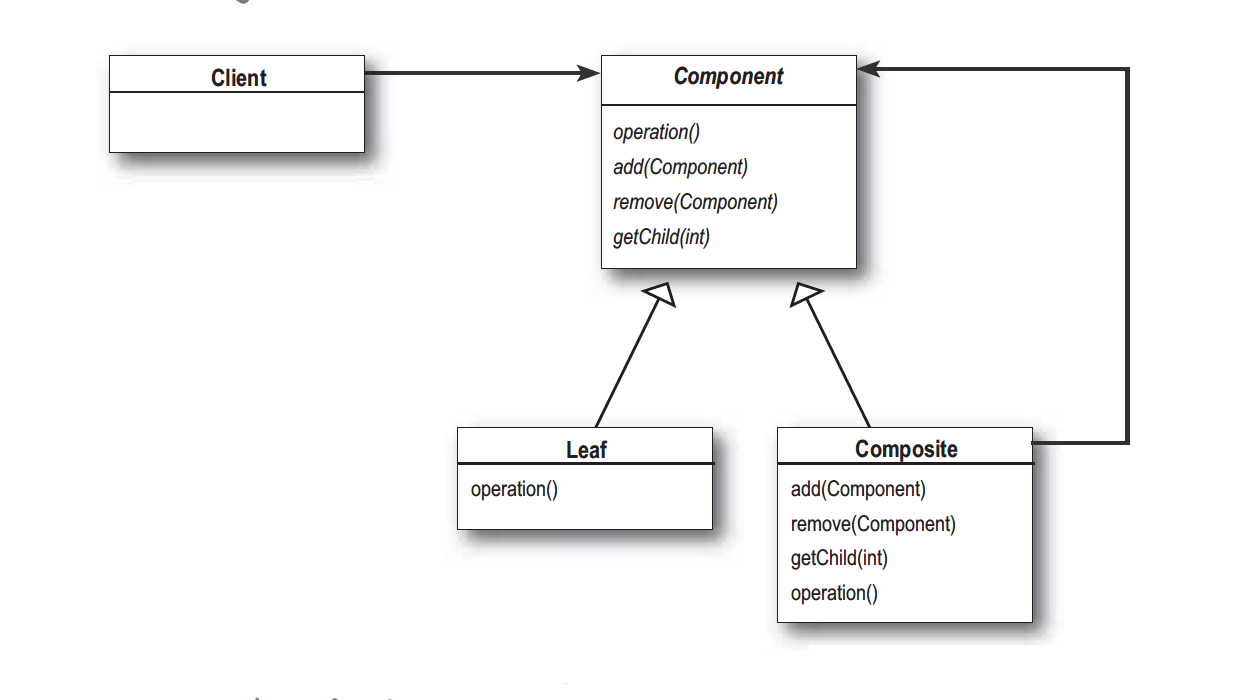
- Component: 宣告合成的內含物件的介面 所有類別的所有操作聯集(包含存取管理Leaf的函式 )
-
Leaf(菜): 定義基本物件的行為 不會有子結點
-
Composite(菜單): 定義非子節點的行為
- Client: 通過Component介面操作復合物件
優缺點
1.簡化client程式碼 用一致的方法去處理復合物件或是個別物件 避免了if-else或是switch
2.可以輕鬆增加Component的類型 新的Composite或是新的Leaf 不需要修改Client
討論
基本上合成模式的好處就是client不需要知道你到底是什麼 我都是一樣的方法用你
要達到這件事 我們就必須有一個uniform的介面給client使用 同時這個介面要包含所有可能節點的所有操作 事實上是挺不安全的(比如說我們根本不想讓一個leaf能夠addLeaf) 這個pattern事實上是以安全性換取了client的便利性
合成+反覆器
故事還沒有結束 雖然我們有print function可以讓waiter把所有的菜全部列出來 但如果菜列到一半 這位認真的服務生突然想上廁所 上完回來想繼續列的時候發現 只能從頭開始列 因為print的實作是stateless的
這時候就需要一個合成的反覆器了 上一篇的反覆器很簡單 因為每個item都是菜 我只需要用一個index來記錄我列到哪裡就可以 但這裡因為每個物件可能是菜可能是菜單 我們可能目前正在好幾層深的菜單裡

這裡通常是用stack來實作
public class CompositeIterator implements Iterator<MenuComponent>{
    Stack<Iterator<MenuComponent>> stack = new Stack<Iterator<MenuComponent>>();

   public CompositeIterator(Iterator<MenuComponent> iterator){
	stack.push(iterator);
    }
   public MenuComponent next() {
	if (hasNext()) {
    	    Iterator<MenuComponent> iterator = stack.peek();
	    MenuComponent component = iterator.next();
	    stack.push(component.createIterator());
	    return component;
	} else {
	    return null;
	}
    }
   public boolean hasNext() {
	if (stack.empty()) {
	    return false;
	} else {
	    Iterator<MenuComponent> iterator = stack.peek();
	    if (!iterator.hasNext()) {
	    	stack.pop();
	    	return hasNext();
	    } else {
	    	return true;
	    }
	}
    }
}
你也可以用queue 這樣印起來就是BFS